Security
Overview
This article discusses eXist-db's security features and how to manage authentication, users, groups, passwords, permissions, and access controls. eXist-db's security infrastructure is built on a Unix permissions model with a single internal authentication realm, with additional support for access control lists and authentication using multiple realms through a central security manager.
Security Manager
eXist-db has a central Security Manager which is configured by the file
/db/system/security/config.xml. This file, which is
generated during database startup, defines what authentication realms are available
to the Security Manager.
This example Security Manager configuration file defines a URL to be used for authentication:
/db/system/security/config.xml
The Security Manager also features an authentication event listener that you can
configure to call a custom XQuery module on each authentication event. For example,
this configuration file would pass authentication events to a module,
/db/security-events.xq, which performs actions when an
authentication event occurs.
/db/system/security/config.xml
illustrating configuration of the authentication event listenerThe XQuery module that receives the authentication events must be a library module
in the
/db/security-events.xq
Authentication Realms
eXist-db always has an internal authentication realm, but also supports multiple authentication realms. This allows you to add one or more external realms which provide user and group authentication for eXist-db.
Default Internal Realm
The "eXist-db realm" is the default internal realm. By default this realm handles the 'SYSTEM', 'admin' and 'guest' users and 'DBA' and 'guest' groups. Any additional users or groups created in eXist-db will be added to this realm.
Every eXist-db realm user has an account with a username, password, and other metadata that is stored in the database. Each user may belong to zero or more groups.
User and group information for the eXist-db realm is maintained in the
collection /db/system/security/exist.
Important
The security collections in /db/system/security should not be manually manipulated or read, rather they should be accessed via the SecurityManager class or the SecurityManager Module. Directly manipulation can lead to inconsistent state and security issues.
The following is a sample user account document for "aretter" in the eXist-db realm:
/db/system/security/exist/accounts/aretter.xml
As this example suggests, eXist-db does not store passwords in the clear, but rather stores hashed values of the passwords (in base64 encoding). eXist-db uses the RIPEMD-160 cryptographic hashing algorithm. Whenever a user supplies account credentials for authentication, the database applies RIPEMD-160 hash to the supplied password and compares it to the hash stored in the user's account document. Storing hashes of passwords is a best practice in security that provides a strong layer of security compared to storing passwords in the clear; the notion is that even if the hashed password is exposed to an attacker, it is difficult to derive the original password from the hash.
Note that the /db/system/security collection is (by
default) only readable and writable by the system or users in the dba group.
The dba group is specially reserved for database
administrators, and only dba users are allowed to create,
remove or modify other users.
LDAP Realm
The LDAP Realm is enabled by default (in
extensions/build.properties,
include.feature.security.ldap is set to
true.) To use the LDAP realm, add an LDAP realm element to
/db/system/security/config.xml, as in this example:
/db/system/security/config.xml for
LDAPExplanation of these elements:
-
The default-username and default-password elements are used to communicate with the LDAP server if a non-LDAP user requests information from LDAP server.
-
The search-* elements are mapping for names.
-
The metadata-search-attribute elements are used for mapping LDAP account metadata onto eXist-db account metadata.
-
The whitelist element contains allowed groups for authentication. The blacklist element contains groups that are not allowed.
-
The transformation element contains actions to be performed after first authentication.
If the config.xml file is configured correctly, then you
should be able to authenticate by LDAP.
OAuth Realm
Due to the variation in implementations across OAuth providers, eXist-db developers have to create provider-specific Java libraries. eXist-db currently supports only Facebook and Google for OAuth authentication (see Facebook Authentication and Google's OAuth documentation.
The OAuth Realm is not enabled by default in eXist-db. To enable the OAuth
realm, set the include.feature.security.oauth property to
true in
extensions/local.build.properties, and rebuild
eXist-db. Then edit web.xml and controller-config.xml to enable OAuthServlet.
After startup eXist-db and add a realm element for OAuth to
/db/system/security/config.xml, as in this
example:
/db/system/security/config.xml for
OAuthExplanation of these elements:
-
Valid values for the service element's @provider attribute are 'facebook' and 'google'.
-
@name unique (in database) name for application.
@key and @secret should be given by OAuth provider.
If configured correctly, you should be able to authenticate by OAuth.
OpenID Realm
OpenID is an authentication mechanism where the identity of the user is maintained by trusted external providers. This takes the burden in maintaining and securing passwords for users off of the eXist-db database and on to the Identity Provider (IdP).
By default, the OpenID service is not built and thus is also not enabled. To recompile the source with OpenID enabled, edit local.build.properties in the extensions directory and change the include.feature.security.openid property from false to true. Then recompile.
#Security OpenID extensions for eXist
include.feature.security.openid = true
This extension compiles into lib/extensions/exist-security-openid.jar. Run eXist-db with that jar should enable extension. To disable service remove the jar and restart eXist-db.
Legacy Internal Realm
Before eXist-db 2.0, the internal security realm was maintained in a different manner. The details are included here for the purpose of informing decisions on migration.
Every eXist-db database user has an account with a username, password and other
information that is stored in the database. Furthermore, every user belongs to
one or more groups - and respectively, every resource in the database is owned
by a user and by a group. By default, the owner is set to the user who created
the resource, and his primary group, but eXist-db allows for different permissions
for the owner, the owner's group and others. However, only the owner of the
resource (or dba users) can change these
permissions.
User and group information is found in the designated XML file
/db/system/users.xml located in collection
/db/system. This file is generated during database
startup. The following is a simple example of a users.xml
document:
users.xml User InformationAs we see from this example, passwords are encrypted using an
MD5 algorithm (e.g. user-1 has the
MD5-encrypted password
"7f0261c14d7d1b8e51680a013daa623e"). Therefore, whenever a user enters his or
her password, the database generates an MD5 encryption and compares it to the
encryption stored in users.xml. Since it is very difficult
for users to guess the original password from the MD5 string, passwords in eXist-db
should be sufficiently secure.
Note that the /db/system collection is (by default) only
readable by dba users (although it is possible to make it
accessible by other users). The dba group is specially reserved
for database administrators, and only dba users are allowed to
create or remove users, or change permissions for other users.
Important
By default, access to an eXist-db database is disabled until a password is set for the administrator (see Changing the Administrator Password below for instructions). Since write permissions for files are granted to everyone, it is important to be careful about how you configure server access for users on a network or the Internet.
Changing the Administrator Password
When the database is started for the first time, two default users are created: "admin" and "guest". (The "admin" user is a member of the dba group, and therefore has administrative privileges; the "guest" user is a member of the group "guest" and is not an administrator). At this initial point, the "admin" password is set to null, and so access to the database is initially granted to everyone. To set restrictions on database access, you must first set a password for the "admin" user. To do this, use either the Admin Client or the User Manager in the Dashboard. If eXist-db is used for applications intended for online web publications, or as an embedded library, it is exposed it to potential exploitation. It is therefore strongly advised that you first change the admin password.
The Admin Client graphical user interface has a dialog box for user management. To
open this dialog box, enter
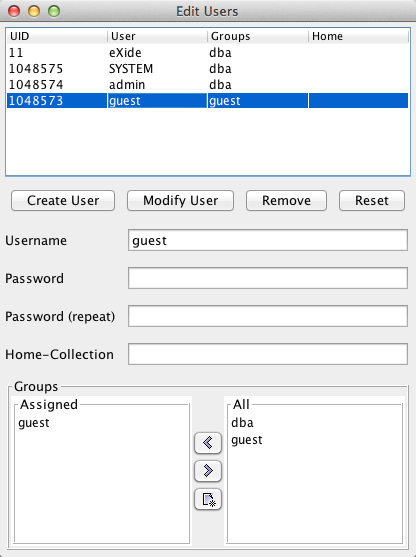
-
At the top, select the "admin" user in the table of users
-
Type in your password into the corresponding fields
-
Click the "Modify User" button to apply the changes
You can also set a new administrator password on the command line in a console or shell. Enter the following at the command prompt:
type help or ? for help.
exist:/db>passwd admin
password: somepass
re-enter password: somepass
exist:/db>quit
Now that the password is set, access control is enabled. To start the shell-mode client as an administrator, you must specify the -u option, following these steps:
-
For Windows and Mac users, double-click on the desktop shortcut icon (if created) or by selecting the shortcut icon from the start menu
-
OR enter the following in a Unix shell or DOS/Windows command prompt:
bin\client.bat -u admin (DOS/Windows)
bin/client.sh -u admin (Unix)
The other default user, "guest", also has the password "guest". The guest identity is internally assigned to all clients that have not authenticated themselves. For example, the Xincon WebDAV interface does not support authentication, so "guest" is assumed for its users by default. Note that this aspect of WebDAV is a potential source of confusion, and you have to be careful about setting read/write permissions for this API.
Creating Users
It is easy to create new users using the Admin Client. In the dialog box, fill in the Username, Password, Password (repeat), and Home-collection fields, and assign a group (or groups) for the new user. Finally, select . The new user will appear in the list of users in the top panel.
The adduser command also allows you to create additional users. The command asks for a password and a list of groups to which the user should belong. An example is shown below:
exist:/db/shakespeare>adduser wolf
password: xxxxxxxx
re-enter password: xxxxxxxx
enter groups: users
To check that the user has been added, use the command users to display a list of all known database users.
Resource Permissions
eXist-db has supports both a Unix like permissions model and simple Access Control Lists. It is important to understand the Unix permission model first, and then consider Access Control Lists, should the Unix Model not prove sufficient for your application.
Unix Model
The default that is based on the UNIX read, write and execute flags for owner, group and world. In versions prior to eXist-db 2.0, there was no execute flag, rather an update flag was present.
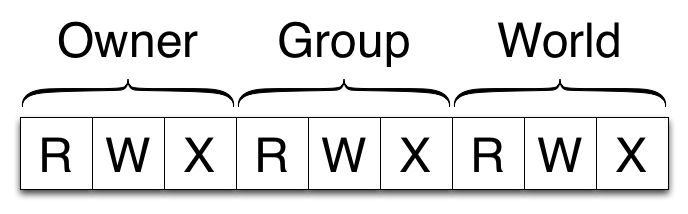
| Category | Description |
|---|---|
| Owner | These permissions work for the owner of the resource |
| Group | These permissions work for the members of the group of the resource |
| World | These permissions work for any user |
Please be aware that permissions for collections are NOT inherited by their sub-collections, i.e., write permissions can be set for some sub-collections, but you must also have write permissions for the parent collection for these to be effective.
Using the Java Admin Client or the command line, you can list the permissions
assigned to each resource (this assumes the client.properties is set to
true). An example listing is shown below:
exist:/db/shakespeare/plays>ls
    -rwxr-xr--      admin   dba     hamlet.xml
    -rwxr-xr--      admin   dba     macbeth.xml
    -rwxr-xr--      wolf    users   r_and_j.xml
    -rwxr-xr--      admin   dba     shakes.xsl
    exist:/db/shakespeare/plays>
As shown on the left-hand side, the Java Admin Client displays resource permissions
in a format similar to the output of the Unix ls -l command:
a ten-character code. The first character represents the type of resource:
- (hyphen) for documents (files) and d for
collections. The next three characters are the permissions for the user: a
- (hyphen) is used for denied permissions,
r for read, w for write, and
x for execute. The next three characters (five through
seven) set the permissions for groups, and the last three for others (i.e.
anyone else who can access the database). Given the previous example, we can see
that all files except r_and_j.xml are owned by user "admin"
and group "dba".
As mentioned in the previous section, the database root collection
/db initially has permissions set to
drwxr-xr-x, i.e. full access is granted to everyone. Also
note that -rw-r--r-- is the default setting for all newly
created resources, i.e. the owner has read/write permissions but not execute,
and the group and others (world) has read permissions.
Changing Resource Permissions
Permissions can be changed using either the Edit
Properties dialog box (shown below) in the Admin
Client or the chmod command in the shell window. The
Edit Properties dialog box is opened by selecting
» from the menu, OR by clicking on the
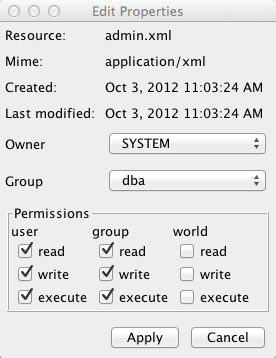
Please note that only the owner of a resource or members of the dba group are allowed to change permissions. All other users who attempt to change these settings will receive an error message.
On the command line, you can use the chmod command to change permissions. This command expects two parameters:
- chmod
-
Parameters:
-
Name of a resource or collection
-
Read, write and execute permissions to set or remove (+ or - respectively, for the specified user, group, or other according to the following syntax:
chmod [resource] [user|group|other]=[+|-][read|write|execute][, ...]
-
For example, to grant the write permission to the group and deny all to others, you may use:
chmod hamlet.xml group=+write,other=-read,-execute,-write
If you do not specify a resource in the first argument of the
chmod command, the permission string will be applied
to the current collection. This is an important feature if you want to
change permissions for the /db root collection, which
would otherwise not be possible. For example, to deny write permissions to
others for the entire database, change directory to the root collection
(i.e. enter cd ..) and enter:
chmod other=-write
Changing Resource Ownership
Only the owner has full control over a resource, and it is sometimes important to change this ownership. The Admin Client provides the chown command to do this. The command expects three arguments:
- chown
-
Arguments:
-
Name of the user.
-
Name of the group.
-
Name of the resource.
chown [user] [group] [resource]
-
For example, to change the owner of the file
r_and_j.xml, you would do the following:
exist:/db/shakespeare/plays>chown wolf users r_and_j.xml
    exist:/db/shakespeare/plays>ls
    -rwxr-xr--      admin   dba     hamlet.xml
    -rwxr-xr--      admin   dba     macbeth.xml
    -rwxr-xr--      wolf    users   r_and_j.xml
    -rwxr-xr--      admin   dba     shakes.xsl
    exist:/db/shakespeare/plays>
Access Control Lists (ACL)
To be written. More information about ACLs is available as slides (PDF) and a presentation on YouTube.
Permission Checks
Each operation in eXist-db enforces permission checks. The details of the permissions required for an operation are laid out below. These permissions should align with a strict Unix model, but if they are found to be incorrect or lacking, please let the project know immediately.
| Operation | Collection | Document |
|---|---|---|
| Open Collection | --x | --- |
| List Collection Contents | r-x | --- |
| Add Document | -wx | --- |
| Remove Document | -wx | --- |
| Overwrite Existing Document | --x | -w- (or owner) |
| Operation | Source Collection | Source Document | Destination Collection (if exists) | Destination Document (if exists) |
|---|---|---|---|---|
| Copy Document | --x | r-- | -wx (w only if destination document does not exist) | -w- |
| Move/Rename Document | -wx | --x (or owner) | -wx | -w- |
| Operation | Parent of Source Collection | Source Collection | Parent of Destination Collection | Destination Collection (if exists) |
|---|---|---|---|---|
| Add Collection | --- | --- | -wx | --- |
| Remove Collection | -wx | rwx (and on all sub-collections) | --- | --- |
| Copy Collection | --- | r-x | --- | --- |
| Move/Rename Collection | -wx | -w- | --- | -wx (When replacing an existing collection, then the permissions for removing that collection must be met first). |
When copying a collection, permissions are checked for each sub-collection and resource.
Copying a sub-collection requires r-x on the sub-collection, and rwx on the destination collection, and if the sub-collection already exists in the destination then r-x is required on that.
Copying resources from a collection requires r-- on the resource, and -w- on the destination resource if it exists, otherwise -w- on the destination collection.