Quick Start
Overview
Installing eXist-db on your computer is quick and easy. First, confirm that your system meets the requirements. Next, download the installer and follow the installation instructions here. Before you know it you'll be up and running with eXist-db.
System Requirements
eXist-db is compatible with all recent versions of Linux, Mac OS X, and Windows. Out of the box, eXist-db requires at least 512 MB of RAM and about 200 MB of disk space. Administrative privileges are not required to install or run eXist-db, but certain installation procedures are not possible without administrative privileges. The critical requirement is that Java be installed.
Note: Java requirements
Since eXistdb 3.0 Java 8 is required.
Note: eXist-db and Java
eXist-db is built on Java, a free, cross-platform software development environment. Java comes in a number of versions, so it is important that you install the version that eXist-db requires: Java 8 (since eXistdb 3.0). eXist-db can run with both the Java "JRE" (Java Runtime Environment) and the "JDK" (Java Development Kit). The JRE is adequate for running eXist-db; you do not need the JDK unless you intend to compile eXist-db from its source code. For instructions about running Java on your operating system, see Oracle's Installing Java page.
Linux users: Unfortunately, Oracle's own pages (such as the link above) focus on commercial Linux distributions. Users of other distributions are better served by distribution-specific instructions. Instructions that eXist-db users have found useful include: Amazon Linux, Ubuntu and Debian.
Special note: In general it recommended to use the Oracle Java VM, this is the safest choice. The OpenJDK 7 is a good open source alternative for the Oracle JVM.
Details of the Java VM can be obtained via the following command (two results displayed):
java -version
java version ""1.8.0_60-ea""
Java(TM) SE Runtime Environment (build 1.8.0_60-ea-b19)
Java HotSpot(TM) 64-Bit Server VM (build 25.60-b19, mixed mode)
Note for For pre eXist-db v2.2 versions: Due to reported compatibility issues it is NOT recommended to use "OpenJDK6" (IcedTea) and "GNU Compiler for Java" (GCJ) which are shipped by several Linux distributions.
Installing eXist-db
Download the installer for the latest stable release of eXist-db from the Downloads page. The installer is a single file called
eXist-setup-[version]-revXXXXX.jar. Here, [version] and
XXXXX reflect the version and revision numbers of eXist-db, and .jar is a Java
Archive file. We recommend that you download the latest stable
release.
Once the download has completed, launch the eXist-db installer. To launch the installer on Mac or Windows, simply double-click the .jar you downloaded. (On Mac OS X 10.7 and higher, a security feature called Gatekeeper may prevent the installer from running since eXist-db is not registered with Apple; to circumvent the warning dialog and allow the installer to run, right-click or control-click the file and select Open.) On Linux distributions with a graphical desktop interface (e.g., Ubuntu), you can launch the installer by making the .jar file executable, right-clicking on the .jar file, and selecting the "Open With ... Java" option. Or, to launch the installer from the command line, enter the following command:
java -jar eXist-setup-[version]-revXXXXX.jar(Windows and Mac users can also use the command line procedure, but most users prefer the graphical installer. For installs on a headless system, see Headless Installation.)
After the installer is launched, follow the prompts described below to complete the installation. We recommend that you accept the default options, since these are designed to make using eXist-db easy. The installer's dialog panes are as follows:
-
Choose the Installation Directory: You will be asked where to install eXist-db on your hard disk. The installer will suggest an appropriate directory, but if you want, you can install eXist-db anywhere on your system.
-
Choose the Data Directory: The data directory is where eXist-db keeps its data files. The installer will suggest keeping the data files inside the application directory, but you can select a different location if you want.
-
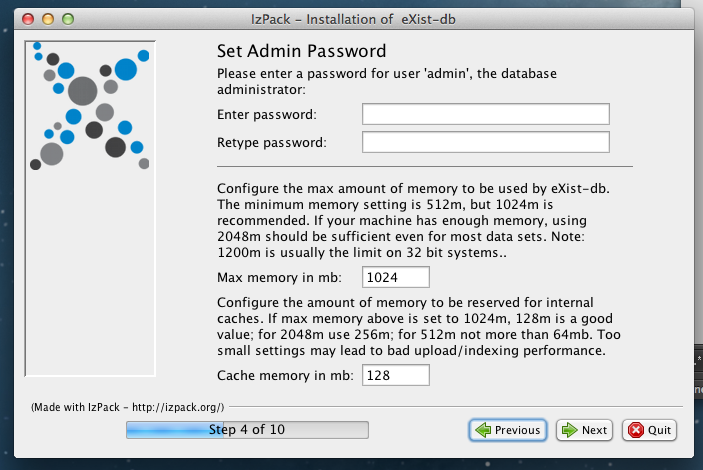
Choose the Admin Password: The Admin Password is a password for the eXist-db administrator account, or more commonly, the "admin" account. This admin account belongs to you, and certain key functions in eXist-db can only be performed by the admin. While you can leave the admin password blank, we strongly recommend setting the password in order to secure access your installation of eXist-db. Why? Keep in mind that while eXist-db is running, it can be accessed by other users on your local network (be it in your home or office, or at a cafe or on a train). So, securing your administrator's account on eXist-db is a good way to protect your data and prevent others from abusing the account. Best to choose a unique password.
Memory Settings: Configure the maximum amount of memory which will be available to Java (and eXist-db) and the portion of it which will be reserved for internal caches.
-
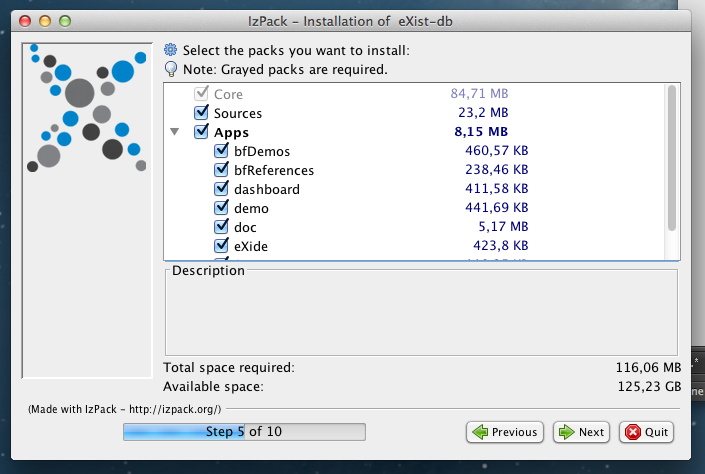
Select the Packs To Install: The "core" package is required to run eXist-db, the "sources" package is optional. Removing "sources" cuts the installation size considerably, but best to install everything unless you are starved for disk space. The "apps" package allows you to select or deselect a number of applications which will be installed into eXist-db when it starts the first time. If you are new to eXist-db, we recommend to at least select "dashboard", "demo", "doc", "eXide" and "fundocs". You'll need those to make your first steps in XQuery development.
-
Installing Files: The installer will now start the install process.
-
Processing: Your newly installed eXist-db is started once to configure the admin password.
-
(Windows and Linux only) Start Menu and/or Desktop Shortcut Options: The installer can create convenient desktop shortcuts and Start Menu entries for starting and accessing eXist-db.
When the installer is finished installing eXist-db, click Quit to close it.
Launching eXist-db
On the Mac, double-click eXist-db's application icon where you installed eXist-db. On Linux or Windows, select the eXist-db Database Startup desktop shortcut icon or Start Menu entry you created at the end of the installation. (To run eXist as a background service, see Running eXist-db as a Service.)
You'll see a splash screen appear showing the eXist-db logo. Upon first startup, eXist-db will upload the applications you selected in the installer into the database. This may take a while and is only done the first time.

Once eXist is started, you will see a new menu bar icon (Mac) or system tray icon (Linux/Windows) for eXist-db. This icon gives you access eXist-db's tools and lets you shutdown or restart the database. Click on it to see a menu providing direct access to the most important tools.

Note: Linux Installation
Installing into the system tray does not work equally well on all operating systems. If the system tray icon cannot be installed, you'll see a small toolbar dialog pop up instead.
Also, the desktop integration does not work properly on all versions of Linux. When using the desktop
launcher, your mileage may vary. However, you may always use the provided shell scripts (bin/startup.sh)
to launch eXist-db in the normal way without desktop integration.
You can also start eXist-db manually if you feel comfortable with the command line:
-
Open your terminal or command prompt.
-
Change (cd) to the directory where you installed eXist-db (e.g., "
/usr/local/lib/exist/" for Linux, "/Applications/eXist/" for Mac, or "C:\Program Files\eXist" for Windows). -
Just calling
start.jarwill start eXist-db via the desktop launcher:java -jar start.jar
If you want to launch eXist-db without a GUI, use the shell scripts in
bin/. On Linux or Mac, enter the following:bin/startup.sh
If you are a Windows user, enter the following:
bin\startup.bat
For more information about these startup scripts, see About the Scripts in the bin Directory.
Note: Having trouble?
If you suspect you have had a problem launching eXist-db, see our article on Troubleshooting. Also see Advanced Installation.
Diving In
After successful installation, the first thing you'll want to do is to access the Dashboard, the central administration and application hub of eXist-db. If the system tray icon works on your system, select "Open Dashboard" from the popup menu. Or just open a web browser and enter the following URL:
You should now see the following web page:
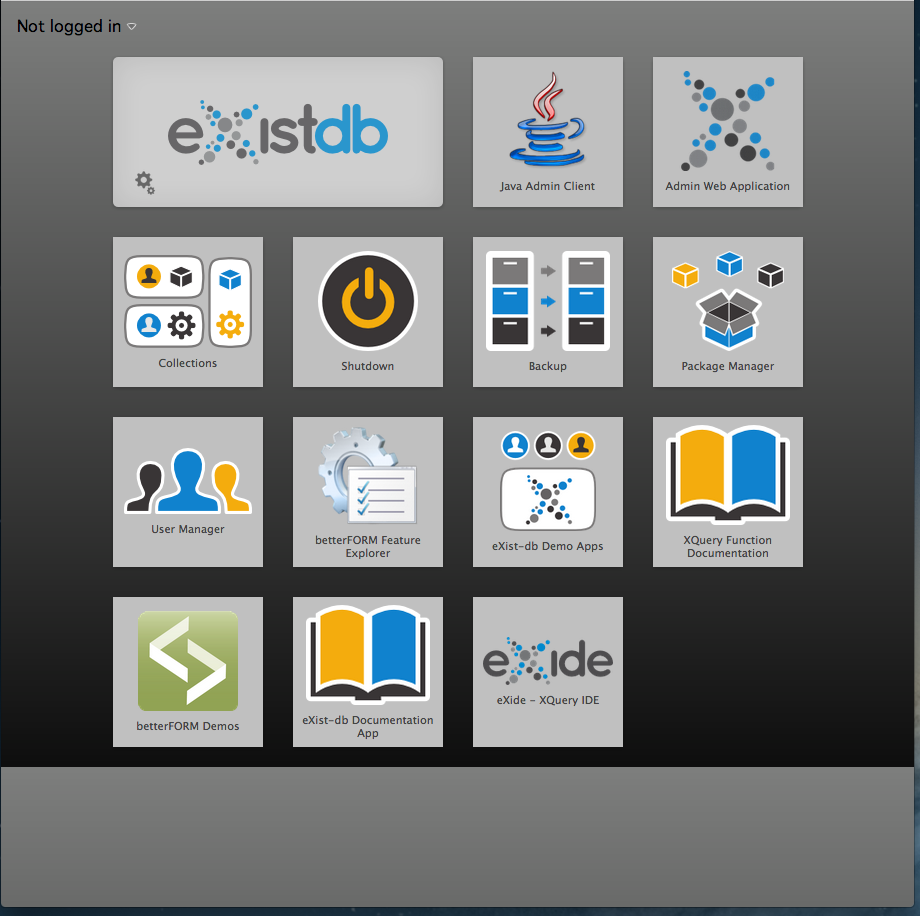
See it? Congratulations! (Not seeing it? See our article on Troubleshooting.)
Do you notice the similarity between the page and the homepage of exist-db.org? You are actually now running a complete, local copy of the eXist-db.org website on your computer.
Now that you have successfully installed eXist-db, you are ready to dive in. Your local copy includes everything you need to do so: the eXist-db Dashboard app, which lets you add application packages from eXist-db.org's public repository (including all of eXist-db's documentation), upload your own data to the database, and perform administrative tasks (like creating user accounts). It also includes the eXide web application for querying the database and creating your own applications.
To learn more about the Dashboard app and installing applications from the eXist-db public application repository, see the article on the Dashboard. To learn more about the eXide app, see the article on eXide.
Shutting Down the Database
Just as you shouldn't pull the plug on your computer without safely shutting it down, you should learn the methods for safely shutting eXist-db down. Improperly shutting down the database can corrupt your data files, so follow one of these procedures to properly shut down eXist-db.
-
The system tray popup menu has an option . You may also choose to shut down eXist-db and the system tray launcher at the same time.
-
From the Dashboard App: select the Shutdown button
-
From the command line, run the
bin/shutdown.sh(Linux/Mac) orshutdown.bat(DOS/Windows) shutdown scripts, using your admin account's username and password.bin/shutdown.sh -u admin -p youradminpassword
bin/shutdown.bat -u admin -p youradminpassword
-
From the command line, run the java command, using your admin account's password:
java -jar start.jar shutdown -u admin -p youradminpassword
-
From the Java Admin Client: select Connection » Shutdown from the menu.