Java Admin Client
Introduction
eXist-db ships with a Java-based Admin Client. This application enables users to perform administrative tasks, such as user management, security settings, batch import of whole directories, and backup/restore of the database. The Client can be used either as a graphical interface or on the command line.
Launching the Client
You can launch the Java Admin Client using one of the following methods:
-
Windows and Linux users: Double-click on the Java Admin Client desktop shortcut icon (if the option to create desktop shortcuts was selected during installation) or select the shortcut icon from the Start Menu (if the option to select Start Menu entries was selected during installation)
-
You can download a Java WebStart file (exist.jnlp) via your web browser; once the download has completed, double-click on the exist.jnlp file to launch the client:

You can also find a Java WebStart Launch icon in the Administration menu in the left sidebar of all documentation pages.
If you built eXist-db from source rather than using the downloadable installer, the Java WebStart function will not work unless you sign the jars. To do so, enter the following on your command line from the eXist directory:
build.bat -f build/scripts/jarsigner.xml (DOS/Windows)
build.sh -f build/scripts/jarsigner.xml (Unix)
-
Enter the following on your command line from the eXist directory (with the JAVA_HOME environmental variable set correctly):
bin\client.bat (DOS/Windows)
bin/client.sh (Unix)
-
Enter the following on the command line:
java -jar start.jar client
Using the Graphical Client
Once the Graphical Client is launched, you will see the "eXist Database Login" window.
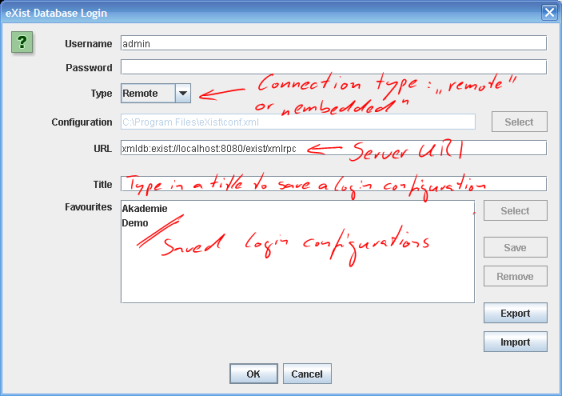
Enter your eXist-db username and password, select "Remote" from the "Type" dropdown menu, and in the URL field enter the URI for your database. By default, the URI for your database is xmldb:exist://localhost:8080/exist/xmlrpc.
The Java Admin Client can either connect to a "remote" server—as demonstrated here—or it can launch an "embedded database", that is, a database embedded in an application which runs in the same process as the client. This "embedded" option is useful for backup/restore or mass uploads of data; writing to an embedded instance avoids the network overhead.
After clicking "OK", the main client window will open.
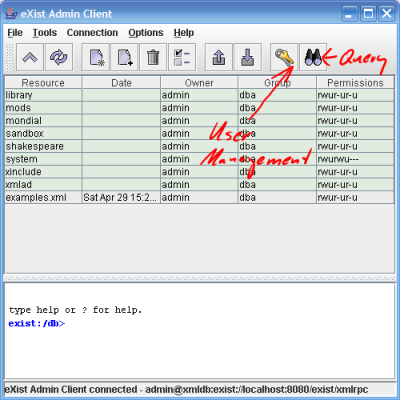
This window is split into two panels, and has a top menu and a toolbar. The top panel lists the database collections; the bottom panel is the "shell" and has a command prompt. This shell allows you to manually enter database commands. Most commands, however, can be accessed using the menu. All of the menu and toolbar items have tooltips that explain their functions.
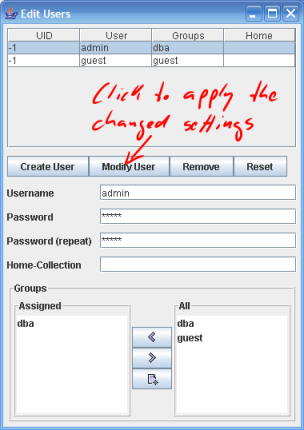
If eXist-db is online, you expose it to exploitation if you use an empty admin password. If you did not specify an admin password during installation, you are strongly advised to set an admin password as soon as possible. You can do this in the Java Admin Client by following these steps:
-
Open the "Edit Users" window by selecting the "Manage Users" icon (image of a pair of keys) in the toolbar
-
At the top, select the "admin" user in the table of users
-
Type in the new password into the password fields
-
Click the "Modify User" button to apply the changes
Using the Command-line Client
It is sometimes faster or more convenient to use the Java Admin Client on the command line. The following sections provide a quick introduction to the most common command line parameters and their use. The client offers three modes of operation:
-
If an action is specified on the command-line, it will be processed in non-interactive mode and the client will terminate after completion.
-
Without an action, the client switches to interactive mode and displays the graphical user interface.
-
If option -s or --no-gui is specified without an action, the client switches to shell-mode and prompts for user input. No graphical interface is displayed.
Interactive Shell Mode
While this tutorial will not describe the interactive shell mode in detail, most commands work like their counterparts specified on the command line. On the shell, just type help to get a list of supported commands.
The shell mode may support full command line history and command completion, depending
on your type of operating system. On Unix systems, the client will try to load the GNU
readline library, which is part of most Unix installations. This gives you access to all the
nice things you probably know from Linux shells. For example, pressing the tab-key will try
to complete collection and document names. However, for this to work, the native library
lib/core/libJavaReadline.so has to be found by the
system's loader. On Linux, just add lib/core to your
LD_LIBRARY_PATH (the client.sh script does this automatically).
On Windows OS, you should at least be able to use the cursor-up/cursor-down keys to browse through the command history.
To explain the shell-mode, we just provide a short example, showing how to store the sample files into the database. Typing mkcol shakespeare and pressing enter will create a shakespeare-collection into which we will put some of the sample documents provided with eXist-db. To check if the new collection is present, enter ls to get a listing of the current collection contents. The listing below shows an example session of how to add the sample documents:
exist:/db>mkcol shakespeare
created collection.
exist:/db>cd shakespeare
exist:/db/shakespeare>mkcol plays
created collection.
exist:/db/shakespeare>cd plays
exist:/db/shakespeare/plays>put samples/shakespeare/
storing document hamlet.xml (1 of 4) ...done.
storing document much_ado.xml (2 of 4) ...done.
storing document r_and_j.xml (3 of 4) ...done.
storing document shakes.xsl (4 of 4) ...done.
exist:/db/shakespeare/plays> cd
exist:/db>mkcol library
created collection.
exist:/db>cd library
exist:/db/library>put samples/biblio.rdf
storing document biblio.rdf (1 of 1) ...done.
exist:/db/library>cd
exist:/db>mkcol xinclude
created collection.
exist:/db>cd xinclude
exist:/db/xinclude>put samples/xinclude
Adding files to the database is done using put. Put expects either a single file, a file-pattern or a directory name as argument. If a directory is specified, all XML and XSL files in that directory will be put into the database. To add the files in directory samples/shakespeare simply enter put samples/shakespeare. To see if the files have actually been stored, you may view the contents of the current collection with ls. To view a document, use the get command, e.g.:
get hamlet.xml
put also accepts file-patterns, i.e. a path with
wildcards ? or *. ** means: any sub-directory. So the command put
samples/**/*.xml will parse any XML files found in the samples directory and any of its sub-directories.
If you ever run into problems while experimenting with eXist-db and your database files
get corrupt: just remove the data files created by eXist-db and everything should work again.
The data files all end with .dbx. You will either
find them in directory webapp/WEB-INF/data or
WEB-INF/data, depending on your installation. It is
also ok to backup those data-files to be able to restore them in case of a database
corruption.
Specifying Parameters
The client uses the CLI library from Apache's Excalibur project to parse command-line parameters. This means that the same conventions apply as for most GNU tools. Most parameters have a short and a long form: for example, the user can be specified in short form with -u user or in long form --user=user. You can also combine argument-less parameters: for example, -ls is short for -l -s.
General Configuration
The client reads its default options from the properties file client.properties. Most of the properties can be overwritten by command-line
parameters or by the set command in shell-mode.
The client relies on the XML:DB API to communicate with the database. It will thus work with remote as well as embedded database instances. The correct database instance is determined through the XML:DB base URI as specified in the properties file or through command-line options. The deployment document describes how different servers are addressed by the XML:DB URI.
The XML:DB base URI used by the client for connections is defined by the uri= property. By default, this is set to uri=xmldb:exist://localhost:8080/exist/xmlrpc. The client will thus try to connect to a database instance running inside the webserver at port 8080 of the local host. This doesn't mean that the client is not communicating through the network. In fact, any XML:DB URI containing a host part is accessed through the XMLRPC protocol.
There are several ways to specify an alternate XML:DB base URI: first, you may change
the uri= property in client.properties. Second, you may use the -ouri parameter on the
command-line to temporarily select another target for the connection. For example, to start
the client in local mode, use:
bin/client.sh -ouri=xmldb:exist://
To access a server running inside the Jetty webserver at port 8080 on a remote host, use
bin/client.sh -ouri=xmldb:exist://host:8080/exist/xmlrpc
Local mode means here, that an embedded database instance will be initialized and started by the client. It will thus have direct access to the database instance. Use this option if you want to batch-load a large document or a huge collection of documents.
Using the -ouri, you can temporarily change any property specified in the properties file. Since switching to local mode is required quite often, there's also a shortcut: specifying
bin/client.sh -l
is equivalent to the -ouri=xmldb:exist:// option shown above.
If you have set a password for the admin user (as described in the security doc), you may have to authenticate yourself to the database. In this case, specify the -u username on the command line, e.g.
bin/client.sh -l -u peter -P somepass
If the -P password option is missing, the client will prompt for the password.
The graphical user interface will always prompt for username and password unless you specify both on the command-line.
Storing documents
To store a set of documents, use the -m and -p parameters, e.g.
bin/client.sh -m /db/shakespeare/plays -p /home/exist/xml/shakespeare
The -m argument differs from the -c option, because it tells the client to implicitely create any missing collection. The -p parameter means that all of the following arguments should be interpreted as a list of paths to XML documents, i.e. you may specify more than one document or directory.
If the passed path denotes a directory, the client will try to store all documents in that directory to the database. However, it will not recurse into subdirectories. For this, you have to pass the -d. For example,
bin/client.sh -d -m /db/movies -p /home/exist/xml/movies
will recurse into all directories below /home/exist/xml/movies. For each subdirectory, a collection will be created
below the /db/movies root collection, i.e. you may use
this option to recursively import an entire collection tree.
eXist-db can also store binary resources in addition to XML files. The client thus tries
to determine if the current file is XML or not. File mime-types.xml
allows to associate :
-
a MIME type
-
an eXist-db type ("xml" or "binary")
-
a file extension
<mime-type name="application/xml" type="xml">
 <description>XML document</description>
 <extensions>.xml,.xsl,.xsd,.mods,.xmi,.xconf,.xslt,.wsdl,.x3d,.rdf,.owl,.xmap</extensions>
</mime-type>
Removing Collections/Documents
The -r and -R parameters are used to remove a document or collection. -r removes a single document from the collection specified in the -c parameter. For example,
bin/client.sh -c /db/shakespeare/plays -r hamlet.xml
removes the document hamlet.xml from the /db/shakespeare/plays collection. To remove the entire
plays collection, use
bin/client.sh -c /db/shakespeare -R plays
Executing Queries
To execute queries, use the -x parameter. This parameter accepts an optional argument, which specifies the query to execute. However, passing XQuery on the command-line is a problem on many operating systems, because the command shell may interprete whitespace characters as command separators. Thus, if no argument is passed to -x, the client will try to read the query from standard input. For example, on Unix you may do
echo "//SPEECH[contains(LINE, 'love')]" | bin/client.sh -x
NB! remember to type Ctrl-d when working without pipe.
bin/client.sh -x ENTER
      //SPEECH[contains(LINE, 'love')] ENTER Ctrl-d
Queries can also be read from a file. For example,
bin/client.sh -F samples/xquery/fibo.xq
executes the XQuery contained in fibo.xq.
There's an additional parameter to be used in conjunction with -x: -n specifies the number of hits that should be printed to the standard output.
XUpdate
You may also update a stored document or multiple documents by passing an XUpdate file
on the command-line. For
example:
bin/client.sh -c /db/test -f address.xml -X samples/xupdate/xupdate.xmlThis will apply the modifications described in
samples/xupdate/xupdate.xml to the document
address.xml in collection /db/test. If you skip
the -f option, the modifications will be applied to all documents in the
collection.
Using an Alternate Database Configuration
If you start the client with option -l or
-ouri=xmldb:exist://, it will launch its own embedded database instance.
By default, the configuration for the database instance is read from file
conf.xml located in EXIST_HOME.
However, you may want to use another database installation, stored in an alternate location. To make this as simple as possible, option -C is provided. The parameter expects a configuration file as argument, for example:
bin/client.sh -C /home/exist/test/conf.xml
This will temporarily launch a new database instance, whose configuration is read from the provided file. As is obvious, option -C implies option -l.
Backup/Restore on the Command-Line
A simple backup/restore client can be launched through the bin/backup.sh or bin\backup.bat scripts. The client allows to backup any local or remote collection available through the XML:DB API. To backup a collection, use for example
bin/backup.sh -d backup -u admin -p somepass -b /db -ouri=xmldb:exist://
This will launch a database instance in local mode and backup the /db root collection. A hierarchy of directories will be created
below the backup directory. The directories correspond
to the hierarchy of collections found in the database.
The tool will also backup user permissions for each collection and document. This
information is written into the special file __contents__.xml placed in each subdirectory. You need these files to restore
the database contents.
To restore the backuped data, use the -r option and pass one of the
__contents__.xml files as an argument. The tool will
restore all files and collections described in the XML file, for example,
bin/backup.sh -r backup/db/__contents__.xml -ouri=xmldb:exist://
will restore the entire database, while
bin/backup.sh -r backup/db/shakespeare/__contents__.xml -ouri=xmldb:exist://
restores only the /db/shakespeare collection.
Please note that users and groups are defined in the database collection /db/system. This collection will thus be restored first.