Getting Started with Web Application Development
Introduction
Being much more than just an XML database, eXist-db provides a complete platform for the development of rich web applications based on XML and related technologies (XQuery, XForms, XSLT, XHTML...).
Key components of this platform are:
-
a standardized packaging format for modular applications, allowing deployment into any eXist-db instance
-
a set of tools to create application packages, integrated into our XQuery IDE, eXide
-
an HTML templating framework for a clean separation of HTML page content and application logic
-
a tight integration with XForms for fast form development
-
a clean approach for the deployment of RESTful services based on XQuery code annotations (RESTXQ)
This tutorial will demonstrate how to quickly prototype an application based on above components. Certainly there are many other ways to integrate eXist-db into your own application. This guide describes only one of the many possible approaches. However, we have found that taking the first steps is the most difficult part for new users, so we tried to make it as simple as possible.
The Packaging
eXist-db 2.0 builds on the concept of self-contained, modular applications which can be deployed into any database instance using a standardized packaging format. Applications live inside the database, so application code, HTML views, associated services and data all reside in the same place - though maybe in different root collections. This makes it easy to e.g. backup an application into the file system, pass it to someone else for installation in his own db, or even publish it to eXist-db's public repository. The documentation, the dashboard, eXide and the eXist XQuery Features Demo are examples of application packages.
The packaging format is compliant with the EXPath packaging proposal, though it
extends it considerably. For distribution, an application is packed into a .xar
archive, which is basically a ZIP archive. The .xar archive contains all the
application code required by the application, and optionally sample or full data,
along with a set of descriptors. The descriptors describe the application and
control the installation process. As an absolute minimum, an application package
must contain two descriptor files:
expath-pkg.xml and repo.xml. You can
read more about those files in the package repository documentation, but knowledge
about these is not required for the following sections, since eXide will create the
proper descriptors for you automatically.
Starting a New Application
To start a new application, open eXide by clicking the link or by going via the dashboard or the system tray menu of eXist-db.
-
From the main menu, select /. The Deployment Editor dialog should pop up. If you are not logged in as an admin user yet, you'll first be required to do so.
-
Fill out the form by choosing a template, a target collection, a name, an abbreviation and a title for the application. All other form fields and pages are optional, so you can ignore them for now.
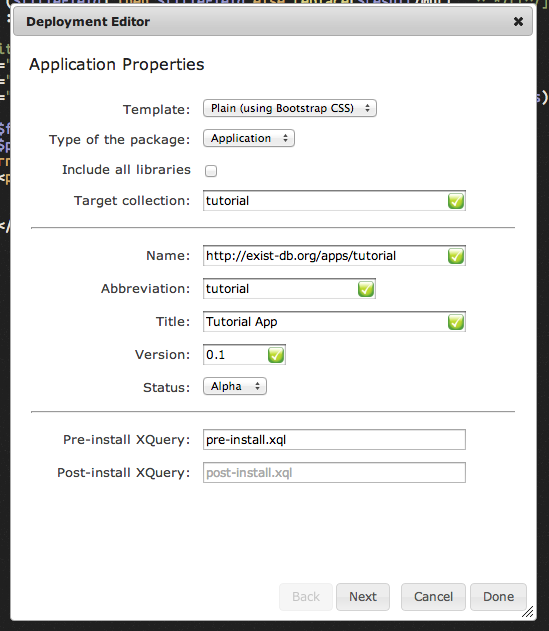
Deployment Editor Dialog The important fields are:
- Template
-
The template used to generate the new application. Right now three templates are available: the "eXist-db Design" template is based on the standard eXist-db page layout and design. The "Plain" template creates a basic page layout without eXist-db specific stuff. Both templates use the Bootstrap CSS library for styling and the HTML templating XQuery module to achieve a clean separation of concerns. The "Empty Package" creates an empty package with just the descriptors in it.
- Type of the package
-
The main distinction between "library" and "application" is: a "library" does not have an HTML view and will thus not appear with a clickable icon in the dashboard. Selecting "library" here does only make sense in combination with the "Empty Package" template.
- Target collection
-
This is the collection where your app will be installed by default. Please note that this can be changed by the package manager during install. It is just a recommendation, not a requirement.
- Name
-
A unique identifier for the application. The EXPath proposal recommends to use a URI here to avoid name collisions so we have made this is requirement.
- Abbreviation
-
A short abbreviation for the application. Among other things, it will be used as the file name for the final .xar package and for the name of the collection into which the application installs. It is thus best to choose a simple abbreviation without spaces or punctuation characters.
- Title
-
A short description of the application, which will be displayed to the user, e.g. in the dashboard.
-
Click on when you have completed the form. eXide will now generate a collection hierarchy for the application based on the template you had selected. Once this has completed, the dialog will pop up to indicate that you can start editing files.
In the following, we assume that the app has been called "Tutorial" and its abbreviation is "tutorial".
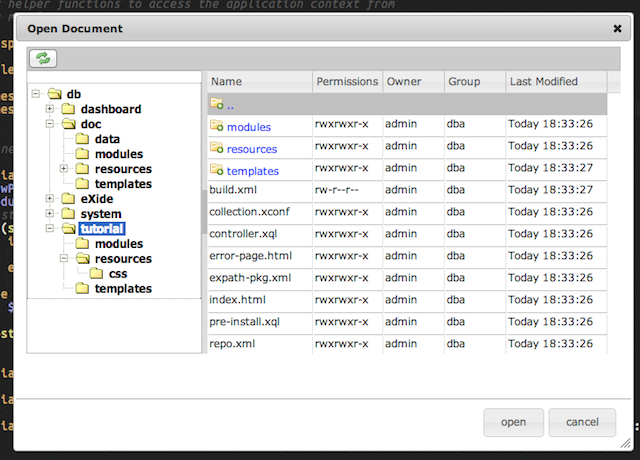
Open Document Dialog after generating application -
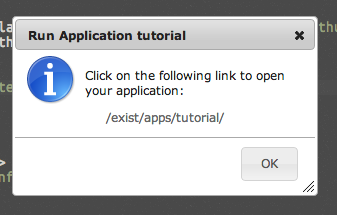
Run Dialog To test if the application has been generated properly, select the
index.htmlpage of the new app in the open dialog and load it into eXide. Withindex.htmlopen, select / from the menu. A small dialog box will pop up, showing you a link to the application.Click on the link to run the application in a separate browser tab.
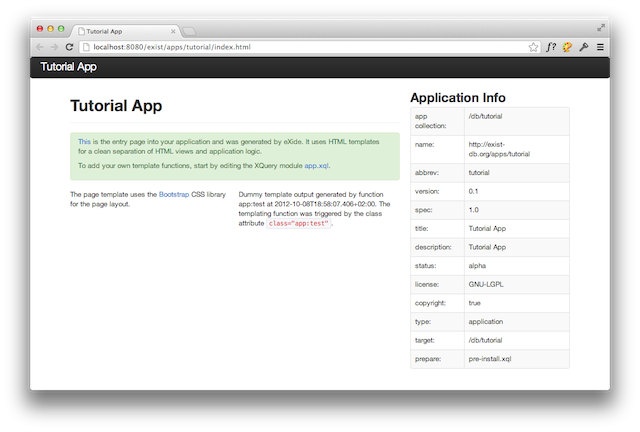
The Default Start Page of the Application All the items in the menu apply to the active app, which is the application to which the file currently open in the editor belongs. You can check which app is active by looking at the "Current app:" status label at the top right of the eXide window.
Understanding the Default Application Structure
As you can see, eXide has created an application skeleton for you which works out
of the box. All resources of the application reside below the target collection
(/db/tutorial).
The generated collection hierarchy follows a certain structure, which is usually the same for all apps which ship with eXist-db. The most important collections and files are described below:
- /modules/
-
Contains XQuery modules. Most of the actual application code should go here.
- /resources/
-
Secondary resources like CSS files, images or JavaScript.
- /templates/
-
Page templates containing all the repeating parts of the site's HTML layout, i.e. all the stuff which applies to every HTML view of the application.
- collection.xconf
-
A template file for the index configuration that should apply to this application. This file will be copied into the correct system collection when the application is installed, thereby automatically indexing any data that is installed.
- controller.xql
-
The URL rewriting controller which handles the URL space of the application. You will rarely need to change this for simple applications.
- expath-pkg.xml and repo.xml
-
These are the package descriptor files for the application that contain the information you entered via the Deployment Editor. You don't need to edit these files directly. Instead, open the Deployment Editor to change any of the descriptor properties.
- index.html
-
The default start page of the application.
- pre-install.xql
-
An XQuery script which will be run by the package manager before installing the app. By default, the script only ensures that the index configurations in collection.xconf are properly copied into the corresponding system collection before the app is installed.
In addition to , you may also define a script via the Deployment Editor. As the name says, this script will run after the app has been deployed into the database and is most often used to copy resources or run initialization tasks required by the app.
You are not required to keep this structure. Feel free to restructure the app as
you like it and remove some of its parts. However, you have to preserve the two
descriptor files expath-pkg.xml and
repo.xml.
The HTML Templating Framework
The generated application code uses the HTML
Templating Framework to connect HTML views with the application logic.
The goal of the HTML templating framework in eXist-db is a clean separation of
concerns. Generating web pages directly in XQuery is quick and dirty, but this makes
maintenance difficult and it is usually bad for code sharing and for team work. If
you look at the index.html page, you'll see it is just an HTML
div defining the actual content body. The rest of the page is dragged in from the
page template residing in templates/page.html.
The controller.xql is configured to call the HTML templating
for every URL ending with .html. The processing flow for an
arbitrary .html file is shown below:
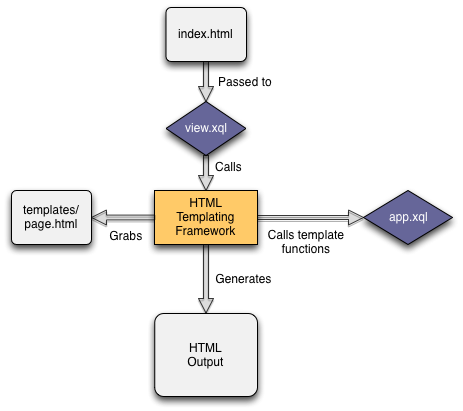
The input for the templating is always a plain HTML file. The module scans the HTML view for elements with class attributes, following a simple convention. It tries to translate the class attributes into XQuery function calls. By using class attributes, the HTML remains sufficiently clean and does not get messed up with application code. A web designer could take the HTML files and work on them without being bothered by the extra class names.
If you look at index.html, the class attribute on the outer
div contains a call to a templating function:
templates:surround is one of the default templating functions provided
by the module. It loads templates/page.html and inserts the
current div from index.html into the element with the id
"content" in templates/page.html. A detailed description of
templates:surround can be found in the HTML templating module
documentation.
In the generated application template, you can add your own templating functions
to the XQuery module modules/app.xql, which is included by
default (you can also add your own modules though: just import them in
modules/view.xql).
Example: "Hello World!"
For illustration, let's implement the traditional "Hello World!" example:
-
Create a new HTML view,
hello.html, in eXide and add the following content. To create the file, choose / from the menu. Make sure you set the file type to HTML (see the drop down box at the top right in eXide).<div class="templates:surround?with=templates/page.html&at=content"> <form action=""> <label for="name">Enter your name:</label> <input name="name"/> </form> <p class="app:helloworld"></p> </div>This creates a simple form and a paragraph which is connected to a template function,
app:helloworld, through its class attribute.Save the HTML view to the root collection of your application, e.g.
/db/apps/tutorial/hello.html. -
Open
modules/app.xqland add an XQuery function matching theapp:helloworldtemplate call:declare function app:helloworld($node as node(), $model as map(*), $name as xs:string?) { if ($name) then <p>Hello {$name}!</p> else () };A template function is a normal XQuery function known in the context of the calling XQuery (
modules/view.xql), which takes at least two required parameters: $node and $model, though additional parameters are allowed (see below). $node is the HTML element currently being processed - in this case a <p> element. $model is an XQuery map containing application data. We can ignore both parameters for this simple example, but they must be present or the function won't be recognized by the templating module. Please refer to the HTML templating documentation to read more about those parameters.The third parameter, $name, is injected automatically by the templating framework. For now it is sufficient to know that the templating library will try to make a best guess about how to fill in any additional parameters. In this case, an HTTP request parameter with the name "name" will be passed in when the form is submitted. The parameter name matches the name of the variable, so the templating framework will try to use it and the function parameter will be set to the value of the request parameter.
-
Open
hello.htmlin the web browser using the base URL of your app, e.g.:http://localhost:8080/exist/apps/tutorial/hello.html
Fill out the box with a name and press return.
The templating framework has many more features, so you may want to head over to its documentation to read more about it.
Exporting the App
Once you have created the first pages of an application, it is usually a good idea
to export it to a folder on disk. You could just click on
/
to retrieve a .xar archive of the application, but exporting
the app to the file system has the advantage that you can continue working on the
app and have eXide keep track of which files have been modified since the last export. You
may also want to add your app to a source control system like subversion or git,
and this is easier if you have a copy on the file system.
To create an export to a directory on the file system, click /. In the popup dialog, fill in the path to the desired Target directory. If you are accessing eXist-db on a server, not the machine you are opening eXide in, this must point to a directory on the server running eXist-db, not your local file system. If you are running eXist from your own machine, the two are the same. The Start time can be ignored for now. It may show the time of your last export if you call synchronize again on the same application.
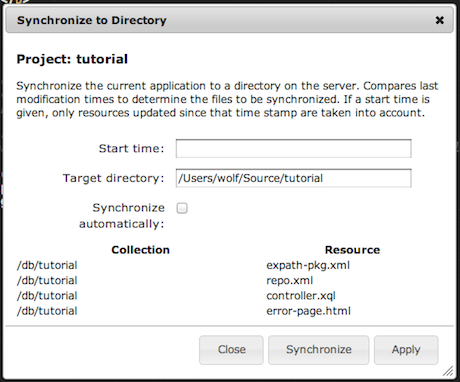
Clicking on will start the export and the names of the written resources should show up in the table at the bottom of the dialog.